Row.co.uk Blog

One of the biggest social media platforms, Instagram, is used by almost everyone who has a smart phone or tablet device. It’s fun to be creative with photos you capture and edit, and then share them with the world on Instagram!

There is, of course, no shortage of camera app replacements to choose from on the app market, but here at Row.co.uk, we have looked into what we believe are the top 5 free photo editing apps for your Android & iOS devices.


To show the comparison we have chosen a photo to edit on each app:


1. VSCO Cam
 
The VSCO Cam app offers a wide range of filters; you get some free with the app, and if you want more there is a whole market of them to choose from. As you can see, we've tested this app by using one of our images.
There is a dialogue you can use to edit many settings such as brightness, contrast, shadows, highlights, sharpening and many more! You can then share the photo to your photo library or straight to Instagram, Facebook, Twitter and many more platforms.


Our Rating: 5 Stars 

2. Camera+ 

The Camera+ app was very interesting to use, it offers a wide range of editing tools which vary from pre-set scenes that complete the edit for you or alternatively if you want to do it yourself, you can use their “lab” feature. This has a large list of dialogues which can take some getting used to. There is, of course, a lot of filters but it seems they are a big much unless you want it to be quite funky and out-there. However, it does give the option to tone them down and add others from their multiple filter feature. 

You can then save the image to your photo library or, just like VSCO Cam, share your editing skills to multiple social media platforms. 


Our Rating: 4 Stars

3. Darkroom Photo Editor

The Darkroom editor is a very simple, easy to use app. If you have tried VSCO cam you will find that there are a lot of similar aspects which doesn't make this app very unique, but if you don’t want anything too complicated then this is very ideal. Some work may need to be done on this app, as when changing the settings it doesn't give you a 0-100% dialogue, so you don’t really know how much you are changing the brightness or any other toning tools. 

You must also be careful when saving the photo as it will ask if you would like to “modify”; if you select yes, then it will overwrite your original un-edited photo. 

 
Our Rating: 3 Stars

4. Snapseed 

The Snapseed app is developed by Google. It is designed differently to other editors, as the way you use the tools is set out in quite a unique way. It takes a bit of getting used to.

The toning options are great and if you want to change the exposure of the image it does it well. You can also detail the structure and sharpness of the photo which can make it look like it wasn't even taken on a mobile or tablet device. There are only 12 filters available on Snapseed and unless you like unique grunge textures on photos, they can ruin the photos slightly. I imagine the app will improve as the developers produce new filters, so it’s definitely worth taking a look at. 

You can save the image to your photo library but there is not option to share to other social platforms, as this is a Google product. 


Our Rating: 3 Stars

5. Polarr Photo Editor 

The Polarr app is very different to others; the interface is designed so that you hold your device in landscape instead of the usual portrait as you would for most apps. It takes a lot of getting used to at first as it is quite complicated and the tools are quite messy. You can change all details of the photo, just like you can on any other photo editing app, and also use one of their many filters available. The difference with this app is that you can create your own filter which you can use again when you want to edit another photo, so it keeps all of the settings. This includes what you used to change the brightness, contract etc. 

You can save the image to your photo library and again to the social platforms such as Instagram, Facebook and Twitter. 


Our Rating: 3 Stars

*The information in this blog is designed to provide helpful information on the subjects discussed. Please seek a professional for expert advice as we can not be held responsible for any damages or negative consequences upon following this information.

Mobile Insurance Free Quote
Comments are closed
iPhone Tips & Tricks That You Might Not Know About

Row.co.uk Blog


Reply with a Message When You Can’t Answer the Phone
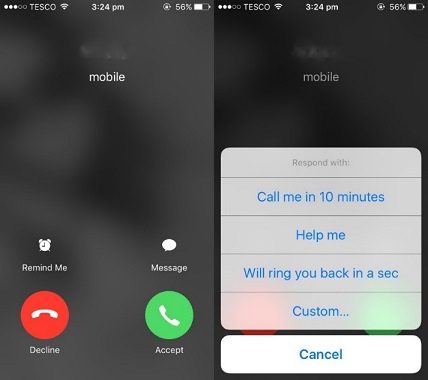
It happens to all of us at some point or another; we’re unable to answer the phone because we’re busy, or perhaps we just don’t want to speak to a certain someone. If you don’t want them to leave a voicemail, the iPhone offers a handy alternative; responding to the call with a text message. To do this, just tap on the ‘Message’ icon that appears above the ‘Slide to Answer’ slider, and then choose either one of the default replies, or customise your own. You can also permanently create a custom reply that will pop up as a default one in the future by going on Settings > Phone > Respond with Text. 


Create Custom Vibrations
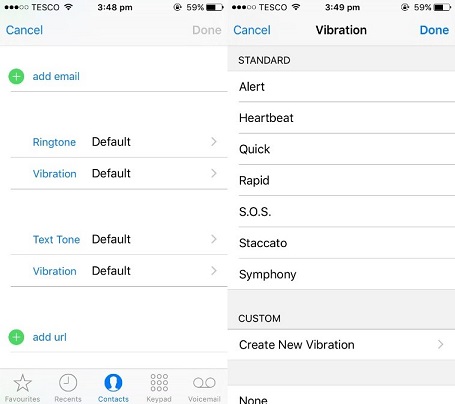
Most people know that you can give your contacts custom ringtones in order to recognise quickly who’s calling, but what about custom vibrations when you need to be slightly more discreet. It’s a very handy tool when you’re in a situation that needs you to be quiet, as you can tell who is calling you without disturbing anyone, or even taking it out of your pocket. To do this, open ‘Phone’ or ‘Contacts’, select a contact and tap on the ‘Edit’ in the top right-hand corner. Scroll down to find the ‘Ringtone’ and ‘Vibration’ fields; tap the ‘Vibration’ field and you’ll see some standard, pre-made vibration patterns to choose from. Below this is the option to ‘Create New Vibration’; click on this and you can make a unique pattern.


Do Not Disturb Mode
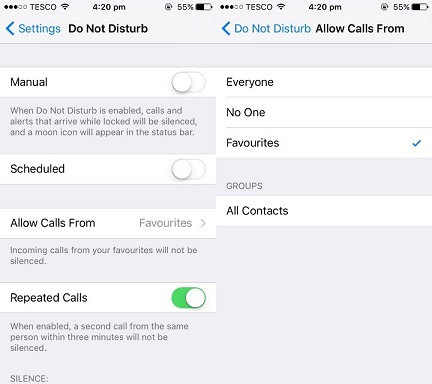
This feature is very useful, especially if you’re getting to sleep or trying to do some work, and don’t want to be distracted by your phone. To activate ‘Do Not Disturb’ mode, go to Settings > Do Not Disturb > Switch ‘Manual’ on. When this is switched on, calls and alerts will be silenced and a moon icon will appear in the status bar. If you’re worried about missing calls from certain people, you can set up various exceptions. Firstly, make sure ‘Repeated Calls’ is switched on, so that a second call from the same person within three minutes will not be silenced. You can then tap ‘Allow Calls From’ and choose your Favourites, so that you will always receive calls from anyone in this group.


Calculator Quick-Delete
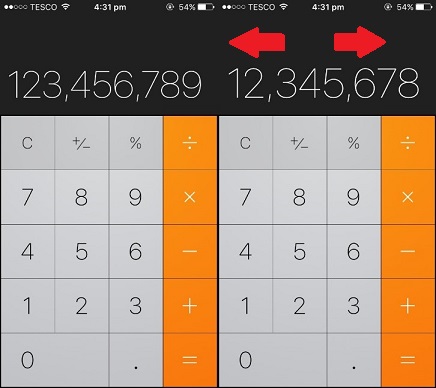
Many people who have an iPhone often make use of the calculator, so this time-saving trick might just help you next time you’re on the app. The calculator app doesn’t have a delete button, which can be extremely frustrating when you’re doing a sum and make a mistake on one of the numbers. You don’t want to start all over again, of course, so what can you do? Well, just swipe (either left or right) across the number in the black area at the top, and for every swipe, you’ll get rid of a digit off the end. 


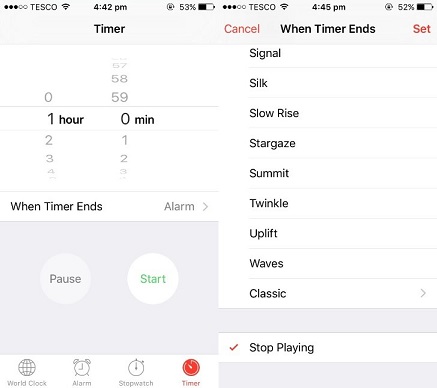
Stop Music with a Timer
It’s always nice to fall asleep to some peaceful music, but the downside is you either have to turn it off yourself before you actually go to sleep (which makes the whole idea of it a bit pointless), or let it play all night. If you use the hidden ‘Stop Playing’ timer, you can choose an amount of time for the music to play for as you fall into dreamland. To create a timer, go to the ‘Clock’ app, click on ‘Timer’ in the bottom right-hand corner, and choose how long you want the timer to last for. Then, tap on ‘When Timer Ends’, scroll down to the bottom, and select ‘Stop Playing’. Start the timer and then play your music from the ‘Music’ app; when the timer ends, the music will automatically stop. 


*The information in this blog is designed to provide helpful information on the subjects discussed. Please seek a professional for expert advice as we can not be held responsible for any damages or negative consequences upon following this information.

Mobile Insurance Free Quote
Comments are closed